


If you’re experiencing lag in Google Chrome, there are several steps you can take to try to fix the issue. Here’s a detailed guide with updated methods for 2023:
Update Chrome: Ensure that you’re running the latest version of Google Chrome. Google frequently releases updates that can improve performance and fix bugs.
How to update Google Chrome?

- Open Chrome: Launch the Google Chrome browser on your computer.
- Access the Menu: Click on the three vertical dots in the upper right corner of the browser window to open the Chrome menu.
- Go to ‘Help’: Hover over “Help” with your cursor, which will expand a submenu.
- Select ‘About Google Chrome’: In the submenu, click “About Google Chrome.” This will take you to a page where Chrome automatically checks for updates.
- Automatic Update Check: When you navigate to the “About Google Chrome” page, the browser will automatically look for any available updates. If an update is found, it will begin downloading automatically.
- Install the Update: If an update is available, you will see the progress of the download. Once the download is complete, you will be prompted to relaunch the browser. Click the “Relaunch” button to complete the update process. Make sure to save any work on open tabs, as Chrome will close and reopen the tabs during the relaunch.
- Update Chrome Manually (if needed): If Chrome doesn’t automatically update, you can manually check for updates by visiting the official Chrome download page and downloading the latest version.
- Check Version: After relaunching, you can return to the “About Google Chrome” page to verify that you are running the latest version. The page should display a message confirming that Chrome is up to date.
Regularly updating Google Chrome not only ensures better performance but also keeps your browsing secure with the latest security patches.
Clear Cache and Cookies: Over time, your browser’s cache can become cluttered, which may cause lag. Clearing the cache and cookies can often improve speed.
Could you please guide me on how to clear my browsing data, including cache and cookies, on Google Chrome?
- Open Chrome: Start by opening the Google Chrome browser on your device.
- Access the Menu: Click on the three vertical dots in the upper right corner of the browser to open the main menu.
- Open Settings: From the dropdown menu, select “Settings” to open the Chrome settings tab.
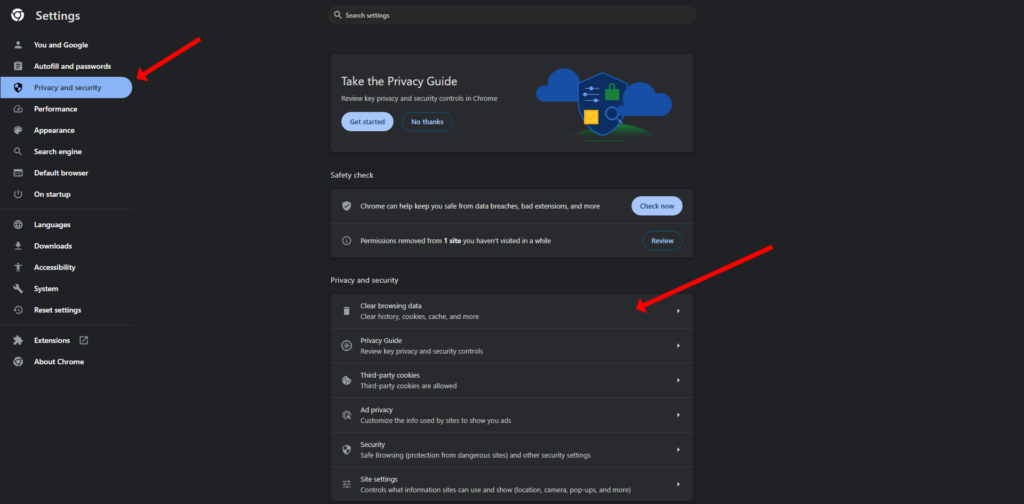
- Privacy and Security: Scroll down to the “Privacy and security” section and click on it to expand the options.
- Clear Browsing Data: Within the “Privacy and security” section, find and click on “Clear browsing data.” This will open a new window with options for clearing various types of data.
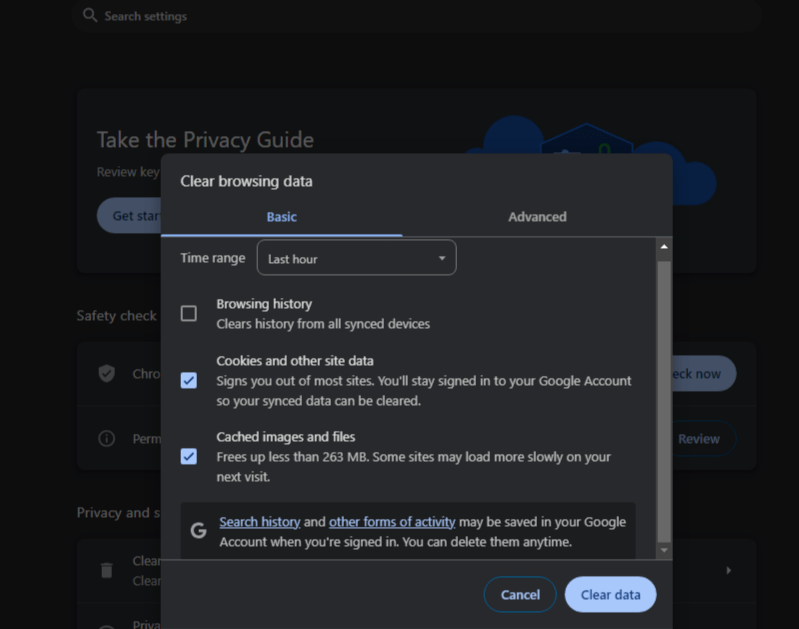
- Choose What to Clear: In the “Clear browsing data” window, you’ll see two tabs: “Basic” and “Advanced.” The “Basic” tab allows you to clear browsing history, cookies, and other site data, and cached images and files. The “Advanced” tab gives you more options, including saved passwords and autofill form data.
- Select Time Range: At the top of the “Clear browsing data” window, you can choose the time range for which you want to clear the data. You can select from options like “Last hour,” “Last 24 hours,” “Last 7 days,” “Last 4 weeks,” or “All time” if you want to clear everything.
- Clear Data: After selecting the types of data you want to clear and the time range, click on the “Clear data” button. This may take a few moments depending on how much data there is to clear.
- Close and Restart Chrome: Once the process is complete, it’s a good practice to close and restart Chrome to ensure all changes take effect.
Remember, clearing cookies will sign you out of most websites, and you may lose some saved data like shopping cart contents or game progress on certain sites. Clearing the cache will not affect your bookmarks, saved passwords, or other saved data.
Disable Unnecessary Extensions: Extensions can slow down your browser. Disable any extensions you don’t use regularly and see if that improves performance.
How to Disable Unnecessary Extensions on Chrome?
Disabling unnecessary extensions in Google Chrome can speed up your browsing experience and reduce lag. Extensions, while useful, can consume system resources and slow down your browser. Here’s how to disable the extensions you don’t need:
- Open Chrome: Launch your Google Chrome browser.
- Access Extensions: Click on the three vertical dots in the upper right corner of the browser to open the Chrome menu. Then, hover over “More tools” and click on “Extensions” from the expanded menu. Alternatively, you can type
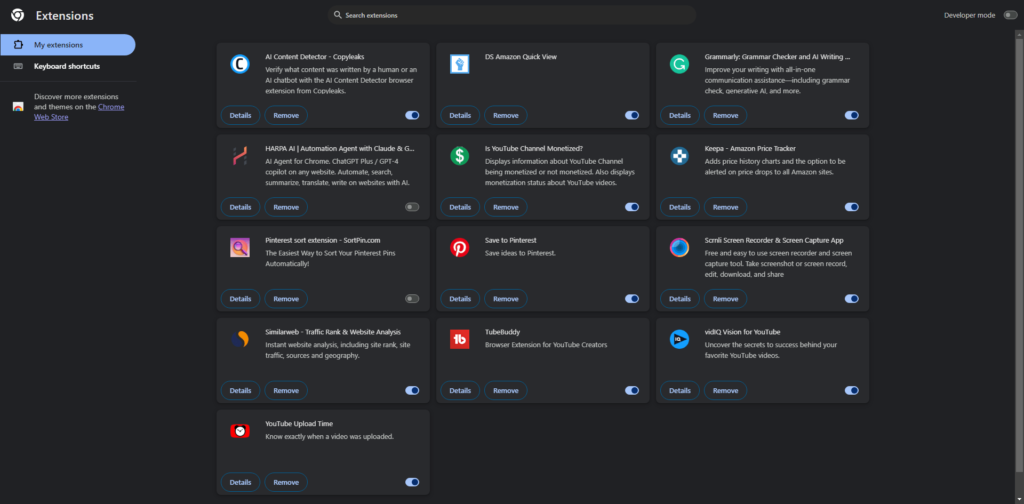
chrome://extensions/into the address bar and press Enter to go directly to the Extensions page. - Review Extensions: You will see a list of all the extensions that have been installed in Chrome. Take a moment to review the list and identify any extensions that you no longer use or need.
- Disable Extensions: For each extension that you want to disable, look for the toggle switch at the bottom right of the extension’s card. Click the toggle switch so that it turns from blue to grey. This will disable the extension without deleting it, allowing you to easily re-enable it later if you choose.
- Remove Extensions: If you decide that you no longer need an extension at all, you can remove it completely by clicking on the “Remove” button on the extension’s card. Confirm the removal if prompted. This action will delete the extension from your browser and free up any resources it was using.
- Manage Extension Permissions: Some extensions do not need to be active all the time. You can manage permissions by clicking on the “Details” button on the extension’s card. From there, you can set when the extension is allowed to run, such as on click or on specific websites.
- Restart Chrome: After disabling or removing extensions, it’s a good idea to restart Chrome to ensure that the changes take effect and that resources are freed up.
By keeping only the extensions you really need and use, you can help Chrome run more efficiently. Remember to periodically check your extensions and perform clean-ups to maintain browser performance.
Check for Malware: Sometimes, malware can cause significant lag. Use Chrome’s built-in Clean up computer feature or a trusted antivirus program to scan and remove any threats.
Close Unused Tabs: Each tab requires memory and processing power. Close any tabs you’re not using to free up resources.
Reset Chrome Settings: If all else fails, you can reset Chrome to its default settings. This can fix problems caused by changed settings or extensions.
Hardware Acceleration: Sometimes enabling or disabling Hardware Acceleration can improve performance. You can find this setting in Chrome’s system settings.
Create a New User Profile: A corrupted user profile could be the cause of the lag. Try creating a new user profile to see if that resolves the issue.
Reinstall Chrome: If none of the above steps work, uninstalling and then reinstalling Chrome can give you a fresh start.
Check Computer’s Performance: If your entire computer is slow, it may be a hardware performance issue. Consider upgrading your RAM or checking for system updates.
Use Chrome’s Task Manager: Chrome has its own Task Manager which can show you which tabs or extensions are using the most resources. You can access it by pressing Shift + Esc while in Chrome.
Limit Background Processes: In Chrome’s settings, you can find an option to continue running background apps when Chrome is closed. Disabling this can improve performance.
Adjust Page File Size: For Windows users, adjusting the size of the virtual memory (page file) can sometimes improve performance.
Optimize Your System: Regular maintenance of your operating system, such as disk cleanup, defragmenting your hard drive (for HDDs), and updating system drivers, can also help.
Network Speed: Sometimes the issue might be with your internet connection and not Chrome. Test your network speed and reset your router if necessary.
Remember, the effectiveness of each solution may vary depending on the specific cause of the lag in Google Chrome. It’s often a process of trial and error to find out which solution works best for your situation.